Segmented Pen Turning
Submitted by craig on Tue, 04/14/2009 - 12:05am.
 This year I want to focus on segmented turnings. While they take a considerable amount of time and patience to not only setup the blanks, but to turn them to size, the results are well worth it. I thought it would be helpful to create a page on the techniques I am currently using to create pens like these. This page will focus on a checkerboard style layout. In this case, a checkboard with a bit of a warp.
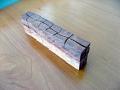 Step 1: Initial Cuts. To start, I like to have a contrasting color scheme. For this pen, I used a walnut and oak combination. The blanks should of similar dimensions which will help when gluing them together later on. Use double sided woodworking tape to hold the blanks together while running them through the bandsaw. I made a wavy cut down the long axis, then cross cuts which will be swapped around. Reassemble the blank on a tape (dry, do not glue) to keep the order of pieces straight.
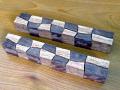 Step 2: Arrange blanks for gluing. take the two cut blanks and separate them from the double sided tape. Swap every other piece from both blanks to create a checkerboard style layout. The fit should be tight if the bandsaw blade did not drift much. At this point I could glue up the blanks as is, but I decided to cut strips of dyed maple veneer and glue that up with the pieces. I used black and red dyed veneers to produce a little variety.
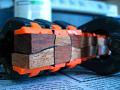 Step 3: Glue and Clamp. Once you have the pieces fit, and the veneer segments cut to size, start to glue up the blank, clamping along the way. I use a Tight Bond wood glue, although you very well could use epoxy or CA. I let this blank setup for at least a day at room temperature before turning. Try to keep the blank a straight and square as possible. This is were having blanks of equal size helps. You can use a stop block to press against while getting the veneer to hold.
 Step 4: Sand and prep blank for pen tubes. once the clamps are off, I inspect the glued blank for any major gaps then sand down the veneer and glue to make the blank as consistent as possible. As an added step, I place the blanks in a pipe clamp then dab a layer of thin-set CA glue to help bind the pieces for the inevitable drilling. I let the CA dry for about a day then cut the blanks in half for the pen tubes. The last part of this step is to drill the holes for the tubes. As a suggestion, I wrap the blanks, very tightly, in tape before drilling. There is a lot of glue that may or may not weaken with the heat of the drill bit. This one held together pretty well.
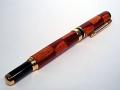
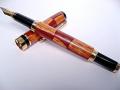 Step 5: Turn to size and enjoy. The only difference of note for turning a segmented blank is to reduce lathe speed. Also make sure you have very sharp skews and gouges. I take very light cuts while rounding the blank off, then I switch to the skew which reduces the amount of sanding required. To finish, I sand up to 600 grit, removing dust between grits, then apply a coat of Danish oil. After the oil sets in for a few moments, I apply several coats of CA glue, while the lathe is spinning, to fill in gaps. The last step is to use the Beal buffing system (three wheel buffing with tripoli, white diamond, and Carnauba wax) to buff the CA shell and add a nice light wax layer. I find CA glue wears a lot slower then high speed wax alone.
This year I want to focus on segmented turnings. While they take a considerable amount of time and patience to not only setup the blanks, but to turn them to size, the results are well worth it. I thought it would be helpful to create a page on the techniques I am currently using to create pens like these. This page will focus on a checkerboard style layout. In this case, a checkboard with a bit of a warp.
Step 1: Initial Cuts. To start, I like to have a contrasting color scheme. For this pen, I used a walnut and oak combination. The blanks should of similar dimensions which will help when gluing them together later on. Use double sided woodworking tape to hold the blanks together while running them through the bandsaw. I made a wavy cut down the long axis, then cross cuts which will be swapped around. Reassemble the blank on a tape (dry, do not glue) to keep the order of pieces straight.
Step 2: Arrange blanks for gluing. take the two cut blanks and separate them from the double sided tape. Swap every other piece from both blanks to create a checkerboard style layout. The fit should be tight if the bandsaw blade did not drift much. At this point I could glue up the blanks as is, but I decided to cut strips of dyed maple veneer and glue that up with the pieces. I used black and red dyed veneers to produce a little variety.
Step 3: Glue and Clamp. Once you have the pieces fit, and the veneer segments cut to size, start to glue up the blank, clamping along the way. I use a Tight Bond wood glue, although you very well could use epoxy or CA. I let this blank setup for at least a day at room temperature before turning. Try to keep the blank a straight and square as possible. This is were having blanks of equal size helps. You can use a stop block to press against while getting the veneer to hold.
Step 4: Sand and prep blank for pen tubes. once the clamps are off, I inspect the glued blank for any major gaps then sand down the veneer and glue to make the blank as consistent as possible. As an added step, I place the blanks in a pipe clamp then dab a layer of thin-set CA glue to help bind the pieces for the inevitable drilling. I let the CA dry for about a day then cut the blanks in half for the pen tubes. The last part of this step is to drill the holes for the tubes. As a suggestion, I wrap the blanks, very tightly, in tape before drilling. There is a lot of glue that may or may not weaken with the heat of the drill bit. This one held together pretty well.
Step 5: Turn to size and enjoy. The only difference of note for turning a segmented blank is to reduce lathe speed. Also make sure you have very sharp skews and gouges. I take very light cuts while rounding the blank off, then I switch to the skew which reduces the amount of sanding required. To finish, I sand up to 600 grit, removing dust between grits, then apply a coat of Danish oil. After the oil sets in for a few moments, I apply several coats of CA glue, while the lathe is spinning, to fill in gaps. The last step is to use the Beal buffing system (three wheel buffing with tripoli, white diamond, and Carnauba wax) to buff the CA shell and add a nice light wax layer. I find CA glue wears a lot slower then high speed wax alone.login to post comments